
Portable chargers have become essential for keeping our devices powered throughout the day. Whether you’re traveling, attending meetings, or spending long hours outdoors, a reliable charger ensures your phone or tablet never runs out of battery. But what happens when that reliability suddenly disappears, leaving you asking, Rush Charge not working?
The good news is that most charging issues are simple to solve. Check the cable for damage, clean the charging ports, perform a quick reset, and recharge the unit fully. These direct fixes resolve most connection or power flow problems without requiring professional help.
In this guide, we’ll explore the common reasons your Rush Charge may stop working and walk you through practical ways to restore it. You’ll also find tips to prevent similar problems in the future, ensuring your charger stays dependable whenever you need it most.
Why Is Your Rush Charge Not Working?
When your Rush Charge stops charging or doesn’t respond, it can be frustrating, but most issues come from simple causes you can fix yourself. Before assuming it’s broken, it’s worth exploring what might be preventing it from working properly. Here are the most common reasons and how to recognize them.
Loose or Damaged Cable Connection
A weak or damaged cable connection is one of the most common culprits. Cables wear out over time, especially near the ends. Try gently wiggling the connector or swapping it with a known working cable to see if the issue disappears—it’s often that simple to fix.
Dirty or Blocked Charging Port
Dust, pocket lint, or debris inside the charging port can interrupt the power flow. Cleaning it with compressed air or a soft brush can restore the connection. A blocked port prevents proper contact, so keeping it clean ensures your Rush Charge consistently delivers stable power.
Overheating or Safety Lock Activation
Like most modern chargers, Rush Charge includes built-in safety sensors that temporarily shut off power when the device overheats. This isn’t a malfunction, it’s protection. Let the charger cool completely before reconnecting your device, and always use it in a well-ventilated space to prevent repeated shutdowns.
Battery Depletion or Calibration Issue
If your power bank is completely drained, it might appear dead even when plugged in. Leave it connected to a reliable wall outlet for a few hours without interruption. Gradual recharging allows the internal battery to recalibrate and can often bring an unresponsive unit back to life.
Faulty Adapter or Power Source
Sometimes, the charger isn’t the problem at all. An unreliable adapter or weak outlet can disrupt current flow and stop charging. Testing your Rush Charge with a different plug or power brick can quickly rule out external power issues before assuming the device has failed.
Incompatible Cable or Device
Not every cable or device matches perfectly with every charger. Using non-certified accessories can cause slow charging or failure to connect. Understanding Rush Charge function helps you recognize that proper voltage and current alignment are crucial for safe and efficient charging performance across different gadgets.
Internal Component Malfunction
With prolonged use, internal circuits can occasionally fail. Signs include no indicator lights or power output, even after full charging. If the problem persists despite checking cables and ports, it’s best to contact customer support for repair or replacement under warranty.
Outdated Firmware or Charging Protocol
Some Rush Charge models may need a soft reset or firmware update to work with newer devices. Refer to the manufacturer’s website or manual for reset steps. Performing this simple update often resolves communication issues between the charger and recently released smartphones or tablets.
Step-by-Step Fixes to Get Your Rush Charge Working Again
A non-responsive charger doesn’t always mean it’s broken. Most Rush Charge issues are caused by minor connection or power problems that can be fixed with a few simple checks. Follow these steps carefully to identify the problem and get your charger working efficiently again.
Step 1: Inspect the Charging Cable and Ports
Start by checking your cable and charging ports for bends, frays, or dust buildup. Dirt or damage can interrupt power flow. Clean the connectors with a soft brush and try a different cable to see if the issue lies with the accessories rather than the charger itself.
Step 2: Check the Indicator Lights
Indicator lights can reveal what’s happening inside the charger. A blinking or dim light may signal a low battery or a safety lock. Refer to the manual for the exact meanings of these visual cues often help you detect simple issues before assuming the unit has failed.
Step 3: Perform a Soft Reset
A soft reset clears temporary glitches caused by voltage inconsistencies or system errors. Disconnect all devices, leave the charger unplugged for a few minutes, then reconnect it to a stable power source. This process helps the internal sensors recalibrate and return to normal operation.
Step 4: Test with a Different Device or Adapter
Connect a different phone, tablet, or adapter to verify whether the problem continues. If the alternate setup charges correctly, the issue likely comes from your original device or cable. This simple test helps isolate the real cause without unnecessary replacements.
Step 5: Charge the Power Bank Fully
A fully drained battery may appear completely unresponsive. Plug your Rush Charge into a stable wall outlet for several hours without interruption. Allowing it to recharge completely helps recalibrate the internal battery system and often restores normal output functionality.
Step 6: Allow It to Cool Before Retesting
Overheating can trigger a temporary power cutoff. If your Rush Charge feels warm, unplug it and place it in a shaded, ventilated area. Once cooled, resume charging in a cooler setting to maintain both performance and battery longevity.
Step 7: Review Brand Support and Resources
For persistent issues, consult the brand’s official troubleshooting guides or contact support. Checking user feedback, such as a verified Rush Charge Universe review, can also offer real-world solutions from others who’ve faced and fixed the same problems effectively.
Step 8: Consider a Replacement Under Warranty
If none of the steps restore functionality, your device may have an internal fault. Review your warranty policy and contact customer support for repair or replacement options. Keeping proof of purchase and serial numbers ready helps ensure faster service and reliable assistance.
How to Test Your Rush Charge After Fixing It?
After completing the fixes, a quick test helps you confirm whether your Rush Charge is performing as it should. Instead of guessing, you can verify each function step by step. These simple checks ensure your charger is reliable, responsive, and safe to use again.

Confirm It Powers On Properly
Before testing with any device, press the power button or check for a quick light response when plugged in. This verifies that internal circuits are active. If the lights appear stable, the charger is receiving power and is ready for a performance check.
Try Charging a Device with a Moderate Battery Level
Connect a phone or gadget that’s partially charged (around 40–60%). This helps you gauge charging efficiency more accurately, as fully drained devices may charge more slowly initially. A smooth power flow at mid-level confirms your Rush Charge is working normally again.
Check for Steady Output
Observe whether the connected device charges continuously without sudden interruptions. Stable charging indicates consistent power regulation inside the charger. If the charging icon flickers or pauses, test another cable or outlet to ensure full stability before regular use.
Monitor Temperature During Use
While testing, lightly touch the charger after several minutes. It’s normal for it to warm slightly, but overheating suggests internal stress. If it stays comfortably warm, your device’s temperature control and battery sensors are working as intended.
Test Port Function Individually
If your Rush Charge has multiple ports, connect one device at a time to each port. This helps you verify that all outputs are working correctly. Uneven performance between ports can indicate minor alignment or contact issues that might need cleaning.
Verify Smartphone Compatibility
Testing a good Android or iPhone compatibility with Rush Charge ensures the unit performs well across major device types. Use an iPhone with a certified Lightning or USB-C cable and observe the charging speed and stability. A consistent power response confirms full compatibility with iOS-powered devices.
Observe LED Indicators for Accuracy
Watch the LED behavior as charging progresses. Lights that change smoothly or display correct battery levels show the internal monitoring system is functioning properly. If the indicators freeze or misreport levels, a short recalibration charge cycle may be needed.
Check Battery Retention After Testing
Once fully charged, disconnect your Rush Charge and let it sit for a few hours. Then reconnect a device to see if it still holds a strong charge. This test helps confirm internal battery health and long-term energy retention efficiency.
When to Replace or Contact Support?
Even with the best troubleshooting, some Rush Charge units develop problems that can’t be fixed at home. Recognizing the signs of deeper faults early prevents safety risks and wasted time. If your charger still fails after testing, here’s when you should consider replacement or professional support.
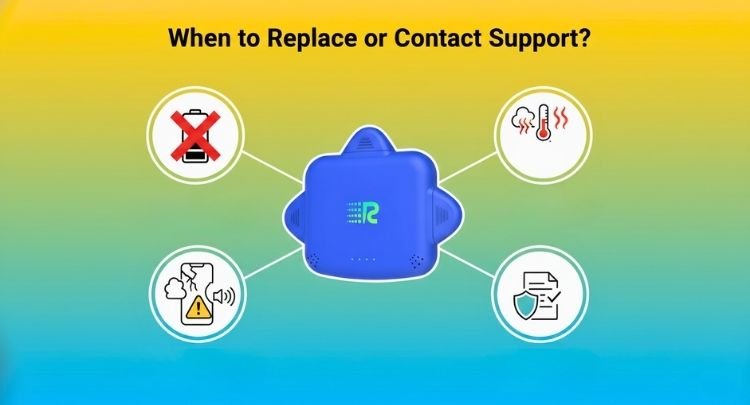
No Power or Response After Full Recharge
If your Rush Charge shows no indicator lights or output even after several hours of charging, the internal battery or circuit board may be damaged. This usually means the device can’t store or release power properly and likely requires repair or replacement.
Persistent Overheating During Use
A charger that overheats consistently, even after short charging sessions, may have a damaged temperature sensor or faulty voltage control. Repeated heat buildup is unsafe and can shorten the device’s lifespan, so it’s best to stop using it and contact support for evaluation.
Physical Damage or Bulging Case
Visible swelling, cracks, or leaks are strong indicators of internal battery failure. These issues can pose fire or chemical hazards. Never attempt to open or continue using a physically damaged unit; disconnect it immediately and seek a professional inspection or replacement.
Unusual Smell or Buzzing Noise
A faint burning smell, clicking, or buzzing sound signals a potential circuit malfunction. Electrical noise typically comes from shorted components or power fluctuations inside the charger. Stop using it right away and contact the manufacturer before further damage occurs.
Indicator Lights Not Responding Correctly
If the LEDs stay frozen, flicker uncontrollably, or no longer correspond to charge levels, the control board may be failing. This malfunction makes it difficult to monitor battery status accurately, which can lead to unsafe or inconsistent charging.
Expired or Active Warranty Period
Before replacing your charger, check its warranty details. Many Rush Charge units come with limited warranties covering performance faults or safety defects. If it’s still within the active period, you can contact support to receive repair or replacement assistance free of charge.
Avoid Unauthorized Repair Attempts
Opening the charger yourself may void the warranty and risk injury. Portable chargers contain sensitive lithium cells that should only be handled by trained professionals. Always rely on certified technicians or official service centers for repair or inspection.
Recycle Safely If Replacement Is Needed
If the unit is no longer repairable, dispose of it responsibly. Look for local e-waste or recycling programs that handle lithium batteries. Safe recycling prevents environmental harm and ensures compliance with electronic waste disposal standards.
Frequently Asked Questions About Rush Charge Not Working
Even after troubleshooting, you might still have questions about what’s normal and what’s not. These quick answers address common concerns users have when their Rush Charge doesn’t perform as expected, helping you understand your charger’s behavior and what steps to take next.
Why Is My Rush Charge Not Turning on?
If your Rush Charge doesn’t power on, the internal battery may be completely drained. Plug it into a stable outlet for several hours without interruption. A full recharge often restores responsiveness if the issue was related to deep battery depletion.
How Can I Tell If My Rush Charge Is Charging Properly?
Look for steady LED lights or charging icons on your device. Flickering or inconsistent lighting might signal a weak connection or calibration issue. Testing with another cable or device helps confirm whether your charger is functioning normally.
What Should I Do If the Rush Charge Keeps Disconnecting?
Frequent disconnects usually point to a loose cable or dusty port. Clean the connectors gently and ensure a snug fit. If the problem persists, try using a shorter, certified cable that supports stable current flow.
Can Rush Charge Overheat While Charging?
Yes, mild warmth is normal during use, but excessive heat isn’t. Overheating can occur due to blocked ventilation or prolonged usage. Unplug the charger, let it cool in a shaded area, and resume charging once it returns to room temperature.
Why Doesn’t My Rush Charge Work With Certain Devices?
Compatibility depends on voltage and cable type. Some older cables or unsupported ports may not match your device’s charging requirements. Always use certified cables and confirm that your device supports the Rush Charge’s power output specifications.
Is It Safe to Leave Rush Charge Plugged in Overnight?
While modern models include safety protection, it’s best to unplug once fully charged. Continuous overnight charging may generate unnecessary heat and reduce long-term battery health, even with built-in overcharge protection.
Can I Fix a Faulty Rush Charge Myself?
You can try basic troubleshooting like checking cables, cleaning ports, or performing a soft reset, but internal repairs should be avoided. Opening the charger can void the warranty and expose dangerous components. Contact customer support for professional help instead.
How Do I Know If My Rush Charge Needs Replacement?
If your charger no longer responds, overheats frequently, or shows physical swelling, replacement is recommended. These signs indicate internal damage that can’t be safely repaired. Always dispose of defective units responsibly through an authorized e-waste program.
Conclusion
Dealing with a charger that suddenly stops working can be frustrating, but most problems have simple solutions. From cable checks to reset steps, a little attention to detail often restores your Rush Charge to perfect condition without needing replacement.
If you’ve ever found yourself wondering, rush charge not working?, remember that patience and proper testing go a long way. Identifying small issues early prevents bigger failures later, keeping your devices powered safely and efficiently.
With careful maintenance and awareness of its safety features, your Rush Charge can continue delivering dependable performance whenever you need reliable backup power.


